Depth of Field - Apps with Depth of FunctionI have tried almost as many DOF apps as I have camera bags. Really. It's that bad/sad. And as with camera bags, DOF apps never really seem to get it quite right. Either they are not sophisticated enough, or are insufficiently flexible, or they work from assumptions that went out with the Ark. Sometimes, their developers just give up the ghost, failing to update their apps in the face of an onslaught of new cameras, lenses, sensor sizes and resolutions. So what was needed, from my personal POV, was an app that had the following two chief characteristics:
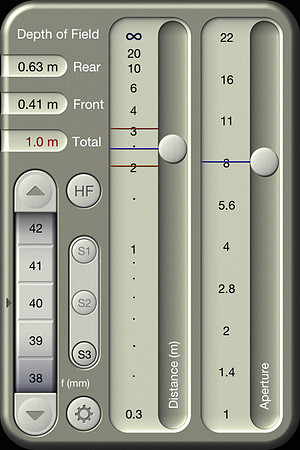
Browsing the App Store recently I found a new candidate, TrueDOF-Pro and, even more useful, its sibling OptimumCS-Pro. I have been trialing them extensively and, though they are not yet perfect (compared to me 'dream team' fantasy) they are already very useful to me on a daily basis. Even better, their Author, one George Douvos, is astonishingly friendly, knowledgeable, responsive and keen to engage with his customers. So things can, as they say, only get better. Before looking in a bit more depth at each app specifically, I want to make a few points which are general to both and which indicate the originality of thinking involved in their conception. Traditionally, DOF has been defined in terms of Circles of Confusion. I won't go into the theory, you probably know it already and it is too long a subject to trot out again here but in short, old-style DOF calculations looked at what precision of level of detail the human eye could not discern beyond in a print, given certain assumptions about what distances the print would be viewed from, usually in terms of a multiple of the diagonal dimension of the print. Hence the laughable but widely held belief that people in galleries automatically step back to a viewing distance in proportion to the size of the image. They might well do for a moment. But then they will get up to as close as they can comfortably focus, probably a foot or eighteen inches, and stare intently before stepping back again. This behaviour is particularly evident in experienced, big-budget purchasers of high end fine art photography. Now this is absolutely NOT to say that they won't buy an image that is less than technically perfect at nose-distance: they are a sophisticated audience, quite capable of discerning whether the creative intent of the image does or does not require enormous resolution. But there are photographers out there (Burtynsky, Crewdson, Kander, Gursky and many, many others) who make and sell very large prints at very high resolution. These large print sizes (say, over a meter on the long side and sometimes much larger) do not just test the peak resolution of the imaging chain: 'print big, look close' also places enormous strain on the DOF in the image. DOF needs to be treated by both makers and consumers of photography as part of the creative intent of the image, and as such it needs to be understood, controlled and accurately deployed. For some images it is in effect a production tolerance. Which is where Mr. Douvos comes in: his apps let the photographer set their own parameters for what is 'acceptable' DOF rather than relying on ancient tables or meaningless scales engraved around the edges of lenses. Better still, they allow for those parameters to be conceived of and entered in terms either of traditional COC or, IMHO more usefully, print size and resolution. And all this in a system that, uniquely, factors the effects of diffraction into the equation - so finally COC is truly useful again. This diffraction accounting is very important: with high resolution digital systems the photographer can no longer count on stopping down to F22 (let alone F32 or F64) to get the required DOF. F16 is a desperate measure for most of us and many won't even stray beyond F8 unless we really have to. The Medium Format Rodenstock 40mm HR lens that I will use in some examples later in this piece comes with the manufacturer's recommendation to shoot only at F5.6 and F8 for best results. But traditional DOF scales just keep on in a linear fashion to F64 with no concern for diffraction. Not any more: both these apps will take diffraction into account and I do believe that is 'a first'. In detail: TrueDOF-Pro Screenshots tell most of what you need to know:
Notes:
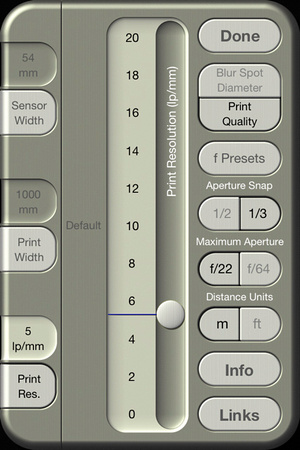
Simple, eh? Let's take a look at the setting screen: Using my preferred parameters, it looks like this:
This is all simple with the exception of that final point: print resolution. It is expressed in terms of Line Pairs Per Millimetre and this is not a measure that will be familiar to all (or even most) users. It took me quite some time to calculate how to enter this value, taking as a starting point the measure of resolution with which I am most familiar. Let me explain. When I make an image with a view to making and selling a fine art print, I generally shoot with a final print size in mind. Of course sometimes I can't know this in advance, and sometimes an image made on a 35mm sensor might be good enough as a piece of work for me to want to print it larger. But in general I shoot with the following in mind:
The above list is absolutely full of human inconsistencies and quirks: the smallest print size is for historic reasons that I have almost forgotten but relates to a show I had where most of the images were shot on a 5DII but some were on smaller format cameras and I needed a compromise print size that worked across the board. It then became my standard size for editions of prints from frames shot on 35mm. Then along came the Nikon D800 and, if I was showing only work from that camera, I would go as far as 34" on the long side because that gives an image about as large as I can print with margins on my 24" roll printer. The medium format print size is determined by the fact that from experience, when I send these frames out for commercial printing on larger format printers, 125cm is about the largest I can go and get a print to the quality that satisfies me when viewed up close, at a distance of around 12-18 inches. On top of all that, I flip flop quite happily between inches and centimetres, having been educated in both systems. This is useful because common photographic calculations also flip flop between imperial and metric. In other words, my criteria are a mess. And I don't think I'm alone in that. However, there is one clear message that comes through: for a good camera with no AA filter and assuming a good capture, I know, reliably, that I will be happy to print to around 210 dpi (actually if pushed, I will go as low as 180 dpi as long as the capture is really good and I am printing on textured fine art paper, which is more forgiving than gloss). And it is that base level of resolution that I need to use in my DOF calculations. In other words, if an object in an image appears acceptably sharp when printed at around 210 DPI* from an un-cropped frame, then I consider it to be 'in focus' - which means 'within my DOF'. So a DOF calculator which lets me specify print size and resolution is absolutely perfect for me. Trouble is, my head for resolution, like most photographers', works in DPI (accurately, PPI but for this purpose they are the same thing) but these apps work in line pairs per millimetre. Here is an example of how to convert: I know that I can get a good print at an output resolution of 210 DPI 1 inch = 25.4mm 210 PPI /25.4 = 8.26 pixels per mm 8.26 pixels per mm = 4.13 line pairs per mm (two adjacent pixel columns, one black and one white, equal one 'line pair'). In other words, to get DPI translated into Line Pairs Per Millimetre, I merely take my preferred DPI for printing and divide it by 50.8 - and then enter that value into the app. Eagle eyed readers will spot that though my 210DPI equates to 4.13 LPPMM, I have entered a value of 5 into the screenshot above. This is because the maximum print width that can be specified is 1000mm but I want to print to 1250mm: so to get the 'right' value I have to adjust the 4lppmm in the ratio of 1:1.25 and that gives a value of 5 (trust me, I have checked all this with the app's author and he agrees my arithmetic). This is a very long-winded way to describe what value you should choose to enter into one parametric window - but it is necessary. Once you understand it, it won't need to be changed often at all. BTW there is also the option to work with Blur Spot Diameter rather than Print Quality. This will please those who are happy with traditional COC values as a way of thinking of resolution. I am not going to cover this because it isn't how I prefer to work but I will say that the difference between Blur Spot Diameter and COC is irrelevant when it comes to knowing which value to enter: just dial in the COC that you are happy with as if they were the same thing. The true difference is that BSD will take diffraction into account without your needing to think about it any further. Again, I checked this with the app's author. For those wanting to establish the BSD value to enter into the app, simply calculate a normal COC by taking your sensor's pixel pitch (width of sensor in mm divided by number of pixels on that side), doubling it and multiply by 1000. For example, a D800E's COC calculated this way is 10 microns, though a D800 might resolve slightly less well due to the AA filter. You get the idea. Having set those parameters according to the above explanations, you can just go back to the main screen, set your shooting distance and fire away in the knowledge that whatever objects fall within the distance parameters of the two red lines will appear in acceptable focus at your chosen print size and resolution or COC settings. Or can you? Does it work? Mostly. There are some problems though.
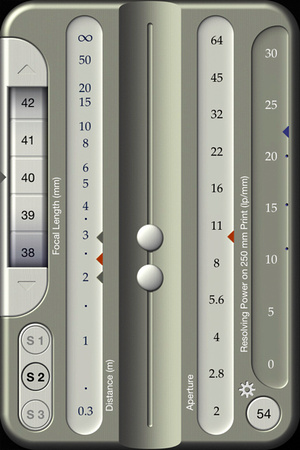
Nonetheless I have already found the app very useful in the field - and far more useful than anything else I have tried. I will give some examples below. I want to add this though: the thing that sets experienced photographers apart from the 'my cousin's got an SLR and can do it for half your price' crowd is the 10,000 hours of practice we have. That 10,000 hours means that we have a sixth sense for DOF and can often judge it very finely. So I think this app is of most use to the less experienced user, or to the expert who is using some new equipment and wants a short cut, or to those who want a sanity check or require greater precision than usual and need the best starting point for some bracketing. All that said, I have been using it blithely and getting really nice results. All of this is a very useful update to a fundamentally traditional way of using DOF. For something more revolutionary, there is another app: OptimumCS-Pro has a very neat special trick: you tell it the distance to the nearest and furthest objects in your field of view that you want in acceptable focus and it will tell you if it can be done and, if it can, exactly where to focus and what aperture to set. Neat, eh? It basically works in a way very similar to the above description but there are some wrinkles so let's take a more detailed look. Here's the main screen:
Now all of this is excellent in theory but there are some problems.
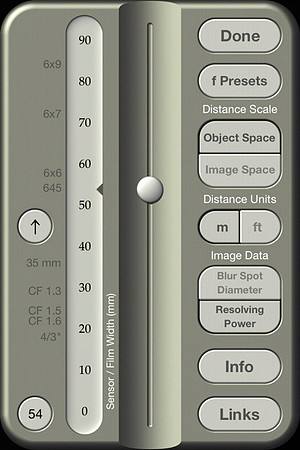
Before we look at how well this works let's take a look a the setting screen, where some other neat possibilities are revealed.
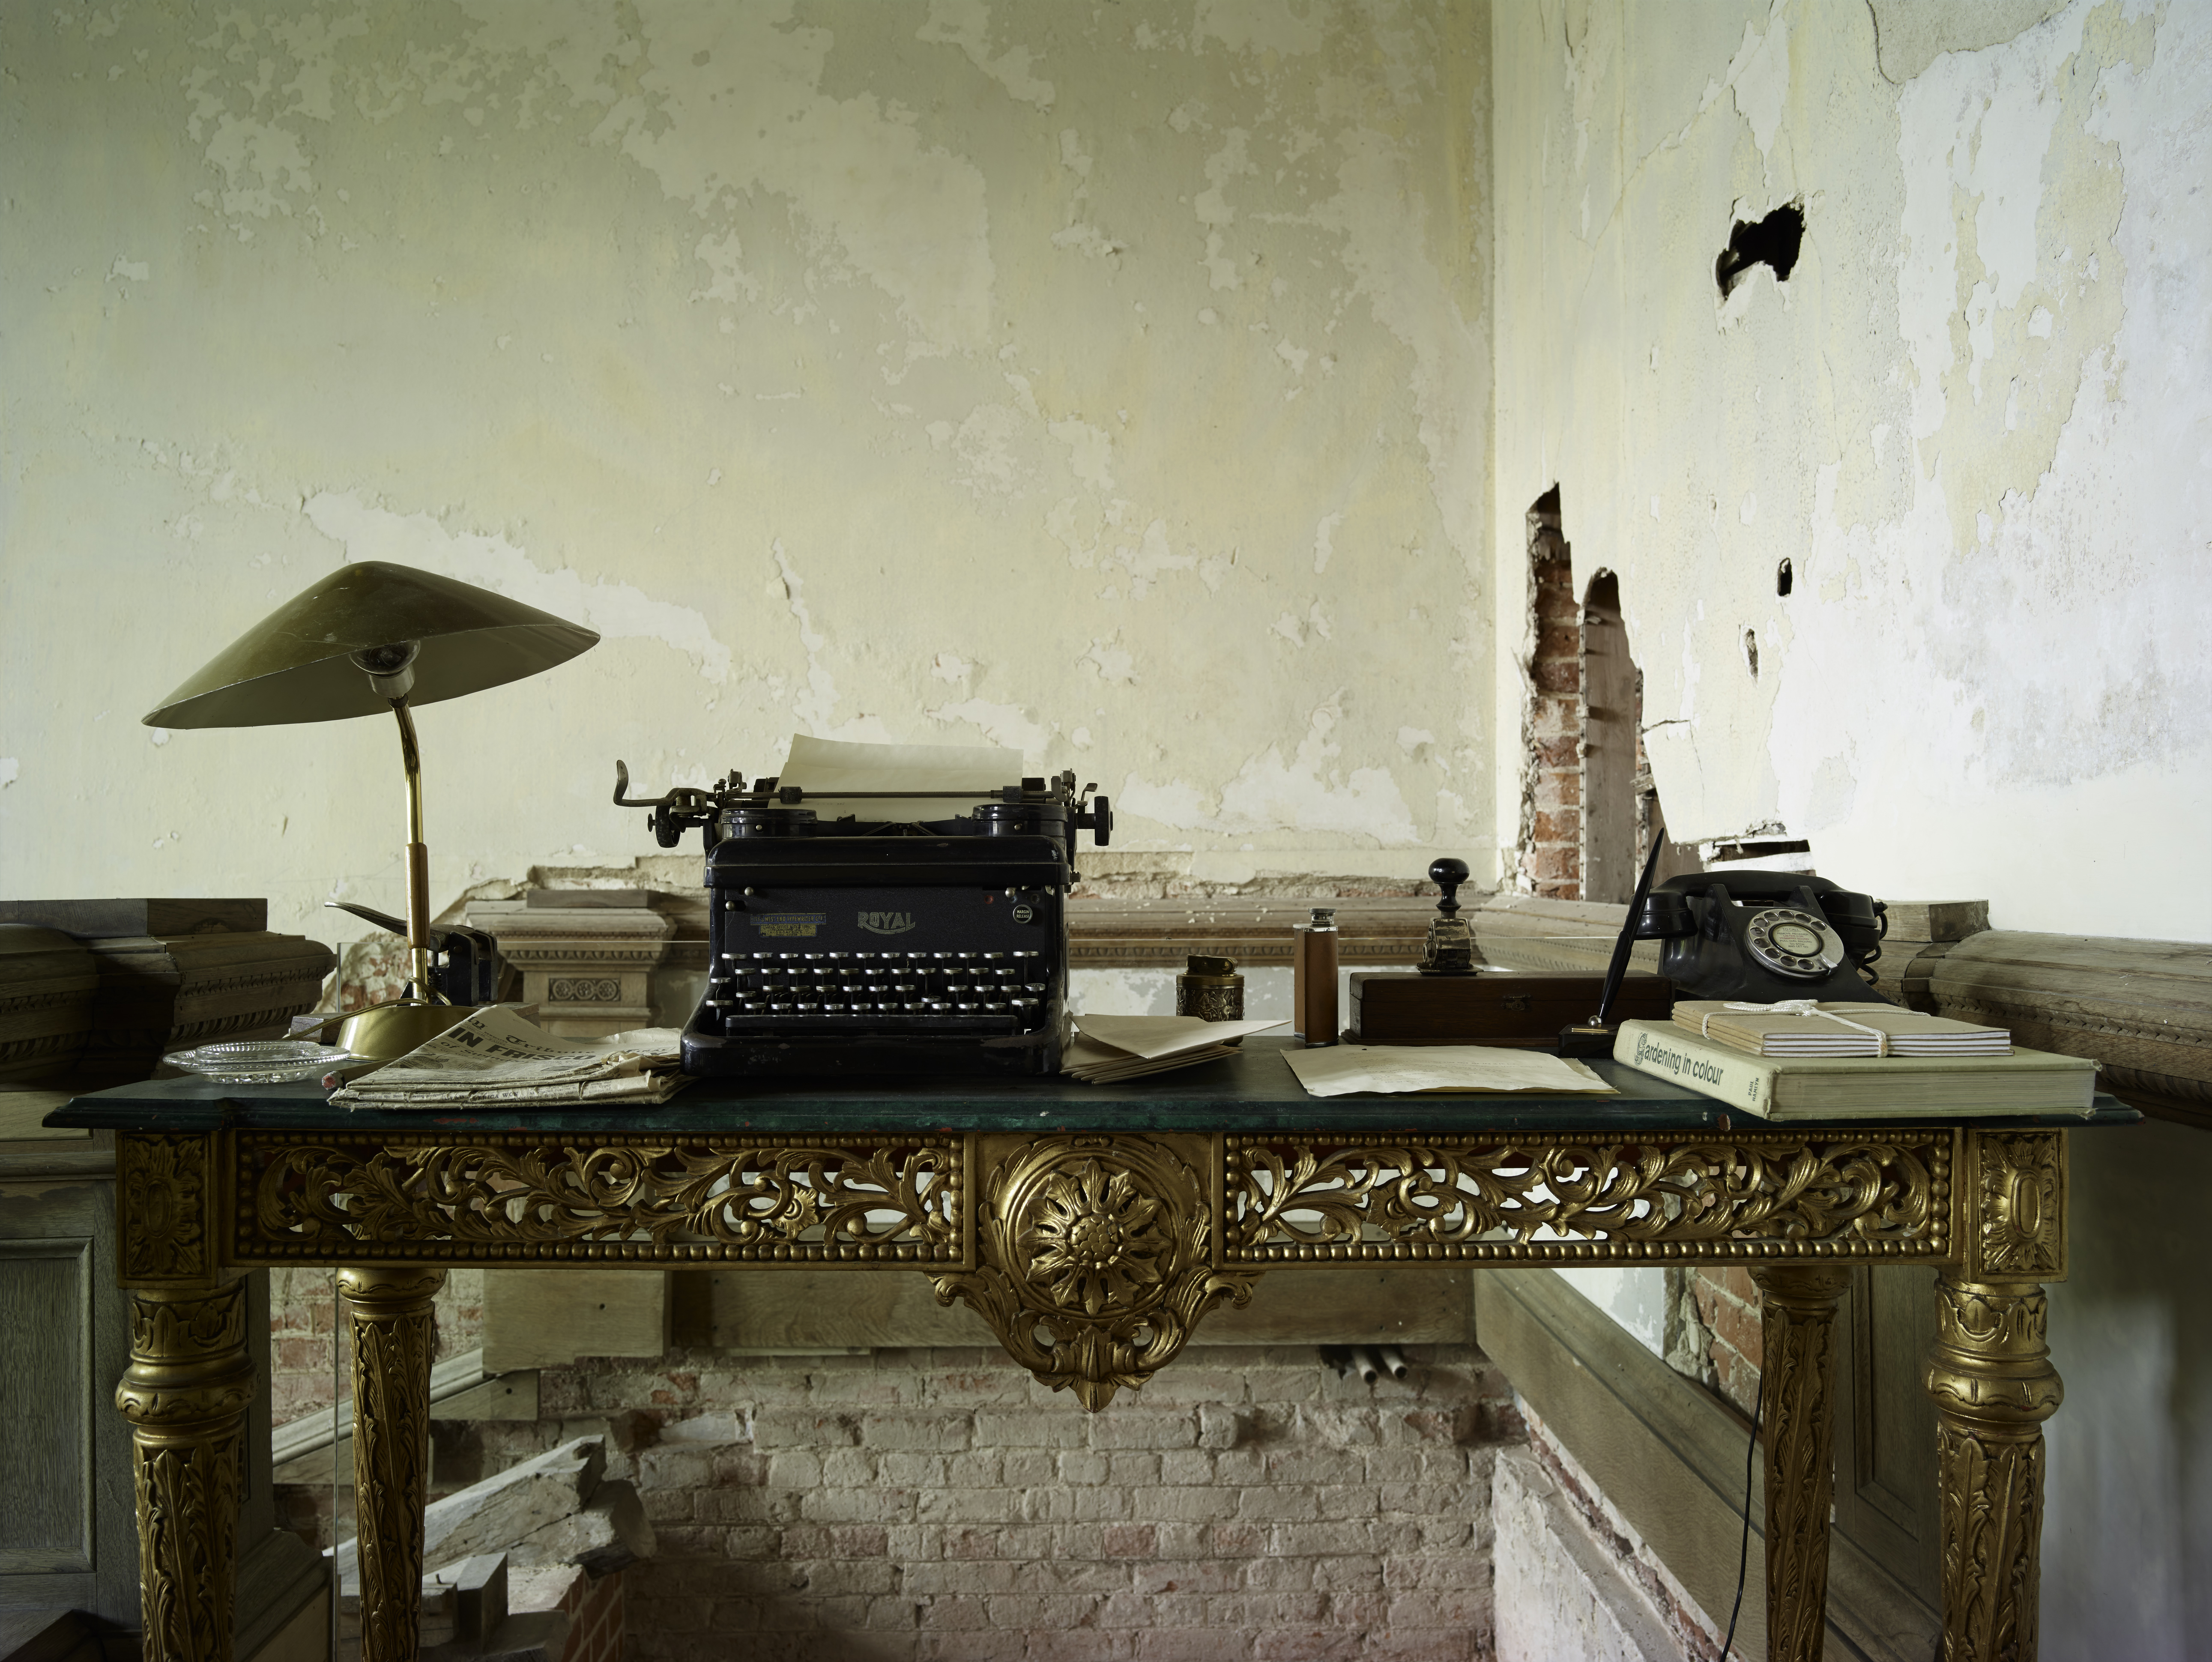
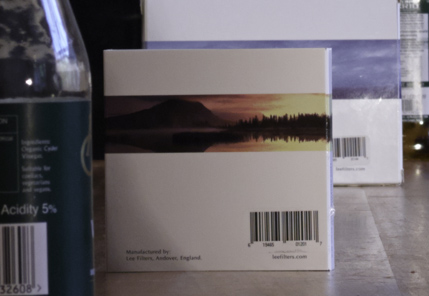
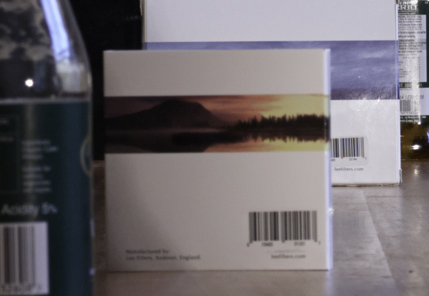
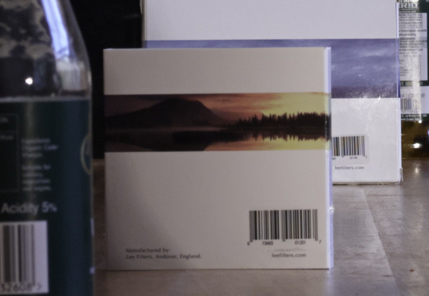
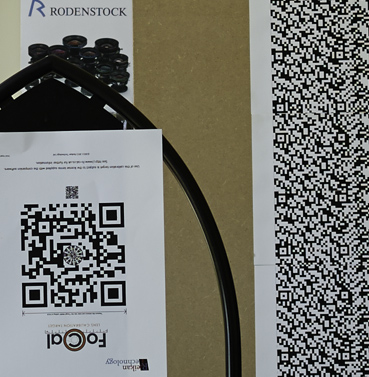
Does it work? I have played, used and tested - three different activities. In play mode, it's a hoot, I really like it despite the niggles. In real world use, it provides at worst a very useful close starting point to getting things exact and it will now be a part of my normal workflow. In fact on a challenging shoot today it just worked, every time. You can't say better than that. Here's an example, and clicking it will load a 50% resolution image in a new window. The aim was to get the front of the desk and everything on the desktop in focus and everything else out of focus. Not easy at close distance and with 80mp... but it worked perfectly: in fact, if you look very closely you will see that the right hand table leg (square carving at top) is sharper than the left - and that is because the one on the left was very slightly closer because I was very slightly off perfectly square to the subject. Now that really is precise! But in testing, the app doesn't quite prove itself as well, performing more as a great guide than an indisputable oracle. I have my theories as to why this might be but first, let's look at two quick tests. For these, I used an IQ180 on an Alpa STC technical camera with a Rodenstock 40mm HR lens fitted with a High Precision Focussing ('HPF') ring. In order to measure the exact distances involved I used a Leica Disto D510, an extremely accurate laser distance measure. I also used as much care as I could muster. Theoretically this combination should give about the tightest results currently possible. The first test involved two barcodes placed at 2 and 3 metres distance. For reference I put two further barcodes in frame at 50cm before and behind my main subjects. I then used the Disto to focus on the 2 metre subject and shot it accordingly at F10, then repeated the exercise for the 3 metre subject. These provide good benchmarks for 'the best the system can do'. Next, I used the app to determine the optimal focus distance and aperture (f10) then I shot at that distance as marked on the lens's HPF ring. Then I looked at the results at 50% zoom on a 100dpi monitor, which emulates my required DOF quite well, especially given that this combination of shooting parameters should have given at least 22 lppmm resolution for both near and far targets compared to my requirement of 21 lppmm. Then I also shot a frame at F8 which should have given me resolution just below my requirement. The results are below in the order stated and they clearly show that for the F10 shot, whilst the 3 metre target is close to acceptable when compared to its benchmark, the 2 metre target isn't. (All frames reproduced at exactly half of shot pixel dimensions. If you are unsure that your browser is rendering them inline at the right resolution, clicking any of them will load the image into a new window from which you can drag it into Lightroom or similar for reliable viewing)
So I ran a 'close to real world' test, with two Reikan targets at more or less random distances but significantly further away. The nearest target is at 4.73 metres and the furthest (hard right) is at 6.473 metres. Behind that, for blur reference, is a Rodenstock box at 7.1 metres. Entering 4.73 and 6.473 gave a suggested focus distance of around 5.4 (it is impossible to read this distance exactly from the app's scale) and an aperture of F6.3 so I set the camera accordingly at that aperture, at which I should have achieved a massive overshoot of over 30 lppmm compared to my required 21 lppmm. So I also shot a frame a stop wider, which should have given me 26 lppmm - still a significant overshoot. The results are as follows and in the following order:
So what's going on? Here are my theories (and remember, the app is performing as part of a complex system with many other parts which all contribute to the result):
For whatever reason or combination of reasons, the imaging chain of which the app was a part in these tests wasn't quite able to 'nail it' in either of these tests. I think there are too many steps in the process which are vulnerable to minor imprecision for the end result to be perfect. But this might well not be the fault of the app at all and at the very worst, its suggestions work as a very close starting point. At greater distances and in my real world use it is proving extremely useful. I have been in contact with George about these issues and he is actively considering making updates that address some of them. In particular, he is interested in making the transition to using DPI as the resolution measure, rather than LPPMM. And he is keen to make the input and readout accuracy more refined. He was also very responsive to some suggestions I had regarding the sorts of FAQs that might be addressed in the already excellent Info/Help section. Conclusion Neither of these apps is a quite a miracle - but they are both a true blessing. I haven't found anything nearly as useful elsewhere, and they are hardly expensive. Any serious photographer would find them useful but, for users of lenses with impressionistic distance scales, the results might be less predictable. For my purposes, both apps taken together constitute about the best value 'bang for your buck' of any photographic purchase I've made. Everyone should have them. * this 210 DPI is a very convenient number: it makes good prints and it is also very close to both a traditional 100dpi monitor displaying an image at 50% zoom or a Retina screen showing an image at 100% zoom - in other words, it lets you preview your resolution and your DOF quite accurately before you print, with no effort)
Keywords:
App,
DOF,
Depth of field,
George Douvos,
OptimumCS-Pro,
TrueDOF-Pro,
ashley,
calculator,
diffraction,
iPhone,
tashley,
tim
Comments
Hi Scott,
Disto is the way to go: accurate to 1mm and reliably so, by far the most accurate part of this imaging chain. The objects I was measuring for this test were all in the very central part of the frame so that was fine but actually the Rodenstock is a comparatively very flat filed lens in that using an accurate central focus distance will give you sharp edges on planar subjects - way better than most other lenses in that focal length range other than the Zeiss on the Sony RX-1...
Why not use a tape measure instead of the laser rangefinder for your distances. How accurate does the Leica discrete RF promist to be, anyway? Also, when you measure from the camera to an object in the corner of the field of view, don't you want to use the distance from the object plane to the extension of the image plane instead, assuming (hah!) a flat field of focus?
No comments posted.
Loading...
|