Sony RX1: Colour Shift & Calibration, Aperture Series, ETTR & moreUPDATE 21st Dec 2012 - Close and Far Aperture Series (scroll down to yellow highlight for more) This is part II of a rolling review of the Sony RX1 and needs to be read in the context of the previously published part I. There's a lot to cover here and, I hope, some useful tips and examples so I will write breezily. Bear with me! Colour Shifts The internet is alive with the latest 'new camera fault' threads indicating that the RX1 is fatally prone to cross-frame colour shifts of the red/cyan type, sometimes known as 'Italian Flag'. This shows on things such as clear areas of white sky as a pronounced cyan tinge to one side of the frame and a red tinge the the other side. It is not, in fact, uncommon - especially in cameras where the exit pupil of the lens is close to the sensor (such as the Leica M9) and is caused by the very acute angle of incidence of light rays as they hit the edges of the sensor compared to the 'straight on' angle at which light hits the centre. This causes both luminance vignetting and it's colour cousin, colour shifts or 'colour shading'. It is worse with wide angled lenses. Manufacturers handle this in two ways: firstly, they design on-sensor micro lenses that behave differently at the edges and corners and secondly, they write firmware that 'knows' what the shift is for a given aperture and applies correction automatically in-camera. This was always a problem with the M9 because that camera passes only rudimentary information from lens to body, so the aperture is in effect closely guesstimated rather than exactly known. We knew from the outset that this might be an issue for the RX1 because of the proximity of the lens's rear element to the sensor - but we also knew that Sony had an easier job than Leica, because the problem is limited to one lens designed specifically for one sensor, and because aperture is always exactly known. Correction should therefore be that much easier. Nonetheless, a few examples of affected frames are circulating online and the panic has begun. I set out to look at how severe the effect is, to examine how the camera handles it, and to explore alternative methods of dealing with it. The good news: it isn't bad. It IS visible, especially at wider apertures, even when in-camera corrections are enabled in the menu. It will generally go unnoticed, masked by the complexity of the image itself. And it's not like the RX1 is going to be used for product shots. But it might sometimes make a blue sky look a little purple on one side and cyan on the other. Again, most people would never notice. But I wouldn't shoot portraits wide open with skin tones close to the edges of the frame. I should mention here one very important thing not mentioned in the manual: most in-camera processing options are applied to JPEG files but not to RAW files. So under Menu>cog symbol>Lens Comp: Distortion for example, selecting Auto versus Off makes no difference to a RAW file. But in the same menu, the item Lens Comp: Shading does affect the RAW file if turned to Auto (which as far as I can tell means 'on'). However, the correction is NOT a full one, and it is possible to do better if you follow the method outlined below. Here's a link to a set of images that show the extent of the issue. The images are at 50% size and though the previews are sRGB, the 'Download Original' option shows Prophoto versions so, if you have a Prophoto-aware application (such as Lightroom) and a calibrated, wide gamut monitor, you will see exactly what is going on. The images were shot using the best technique there is for this: I used a Phase One Lens Cast Calibration sheet, a thick piece of optically neutral perspex that diffuses light fully and was designed for exactly this purpose: shooters of medium format digital backs on technical and field cameras have been doing this for years (many such systems are badly afflicted) and that is why I have the sheet. This is an example of the camera shot in this way at f2 but do be aware that it will show here as sRGB and therefore give you only a rough idea:
So let's take a look at some f2 results, all of which are in the set I referred to above if you want to look at larger versions in Prophoto by downloading the originals. They are in the following order: Uncorrected, corrected in camera, corrected in Cornerfix.
Note that however you choose to make corrections, they come at a cost: effectively individual colour channels are being selectively altered and that has consequences for noise and for later post-processing flexibility of the file. It may be that Sony is fully aware of all the above and have chosen not to apply full corrections in-camera for some reason (processing overhead, deleterious effect on the file, a desire not to 'half-bake' the RAW file too much) but I think they will get pressured by the bad PR into issuing a firmware update that goes somewhat further than the in-camera corrections currently do. Final note: Capture One has had the ability to create and apply profiles from reference shots for years. Unfortunately it only works with their own proprietary file format, so cannot be used on RX1 files. Camera Calibration Profiles Lightroom has, in the develop module, the ability to select from a variety of Camera Calibration profiles. You can even choose to apply these on import of RAW files. The choice varies from Adobe Standard through a wide variety of Camera versions, made to emulate the Sony options themselves, such as Camera Standard, Camera Neutral, Vivid, Clear, Deep, Landscape etc.
You can also use an X-rite ColourChecker Passport to make your own camera calibration profile, as I have done. This involves shooting the X-Rite target with the RX1 and then opening that file in Lightroom, then exporting it, via an X-Rite plugin, so as to create a profile that will then appear (after re-starting Lightroom) as a selectable Camera Calibration Profile. Experience so far shows that which profile looks best varies per the individual image on which you are working. This gallery has examples, again with the originals in Prophoto for those who want to see exactly what is going on, of the above image processed in a variety of ways including with my own home-made X-Rite profile. My personal feeling is that Camera Standard is the best place to start but that, if you ever find yourself in unusual lighting conditions, you might want to carry an X-Rite Passport with you so you can create a bespoke profile for the shots you are making. A final note on colour: some people think Sony sensors have the best colour. Others think they have oddly strong yellows and greens. I think that a lot of this depends on which Camera Calibration profile you use but I will say that if you have green-yellows (such as grass) in shade areas of the frame, and you decide to lift them in post by adding some positive Shadow correction, those shades will often go a sickly yellow. I find that in Lightroom, dialling in a little negative Yellow saturation AND luminance, but slightly boosting the Green saturation, helps. YMMV! The Lens - and Aperture Series The lens is wonderful, great, brilliant, but not quite as brilliant as some reviewers think: it has one flaw, and possibly two. First, the good stuff: it in general has great manners. Very little field curvature, no notable focus shift (as I showed with examples in part one of this review), fairly low distortion, pretty good aberration behaviours, and it is damned damned sharp. It has an MTF curve to die for, and the curve translates into real life pretty impressively - even wide open, performance is great and, equally usefully, diffraction (gotta love them fat pixels) doesn't kick in badly until after F11 so if you want DOF, you got it. I shot the following scene at every full aperture stop on a tripod with (trust me) blameless technique:
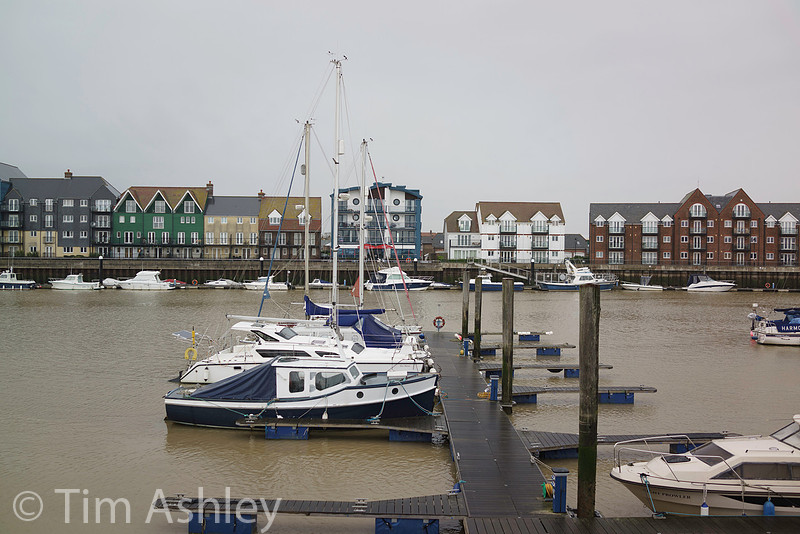
If you look closely, you will see flaw number one: there is some odd mid-field weakness that kicks in at F4 and then disappears as you stop down. Look at the green building, left, the leftmost bay, two small white windows. Worse news: I have seen this effect, noticeably, in some frames even at 50% on screen magnification, though only sometimes and only in frames shot at F3.2, 3.5 and 4. It can be enough to make that section of the image look notably less sharp than the rest of the frame and it will show in a print over about 20", possibly smaller. This effect might be singular to my lens (a defect?) or it might be a signature of the optical design. Let me know if you can replicate it. I suspect that it is 'endemic' to the RX1 and that it results from a combination of slight focus shift with slight field curvature with certain points of focus in scenes of certain 'shapes' at certain distances: . I don't currently think it's worth returning the camera for but I will test further and I do think it is a significant fly in the ointment, espcially since it is widely said in other reviews that F4 is the sweet spot and that people will likely do a lot of shooting at F4 if they've read that. Luckily I'm an F2, F2,8, F5.6 and F8 guy! When the weather clears here (it has been tipping down since I returned from Barbados) I will shoot my usual distance series: this is a far hillside and it will show whether or not the lens is as sharp at far distance as it is at mid distance as above. That is not necessarily a given, and there are lenses such as the Zeiss 25mm ZF.2 that are less impressive a far distance than at closer range: and I have seen some hints that such might be the case with the RX1. This would be flaw #2. I will post and discuss those results here when I have them. I will also do a close-range series, though I must say that the lens seems to me spectacularly good with near subjects. My overall conclusions about the lens will have to wait until those series are shot. UPDATE 21st Dec 2012 - Close and Far Aperture Series I have now conducted my close and far aperture series tests. Both series are here and are available as full sized originals (but converted from RAW to Prophoto JPEG with no lens corrections) and they look like this:
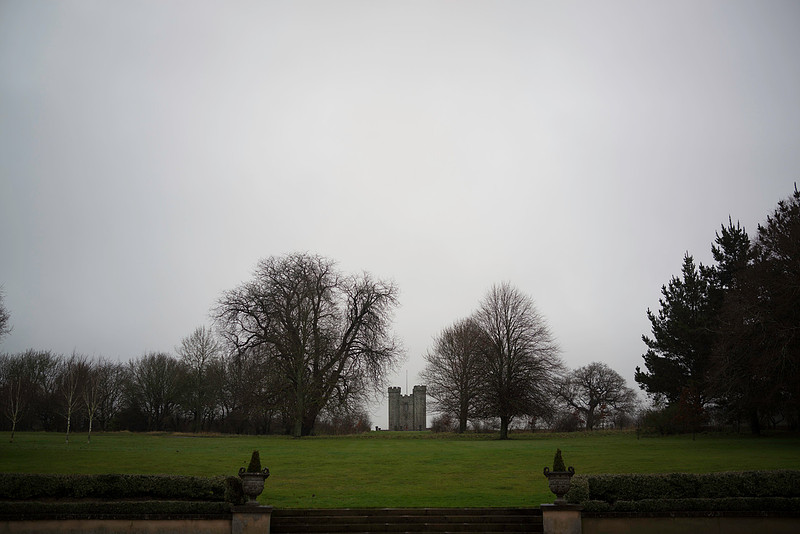
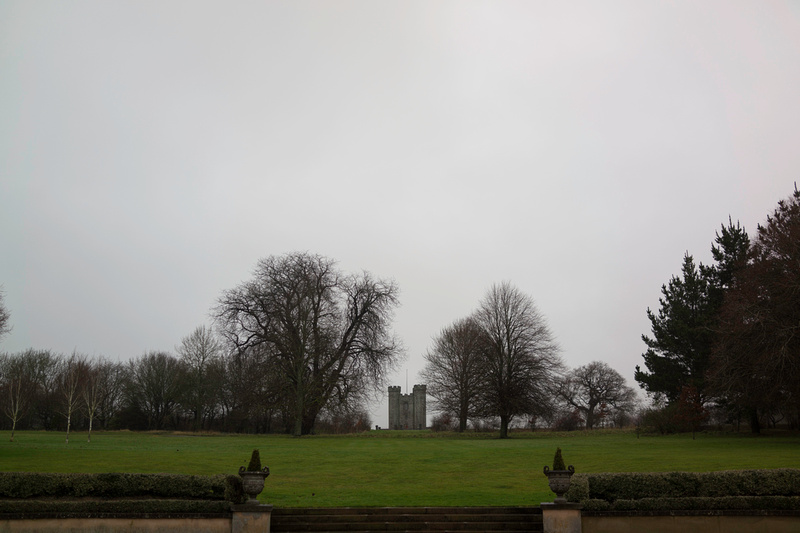
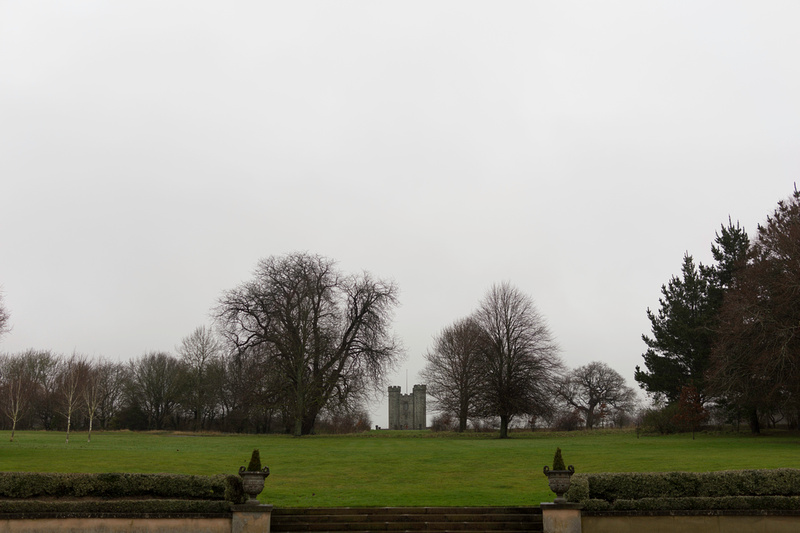
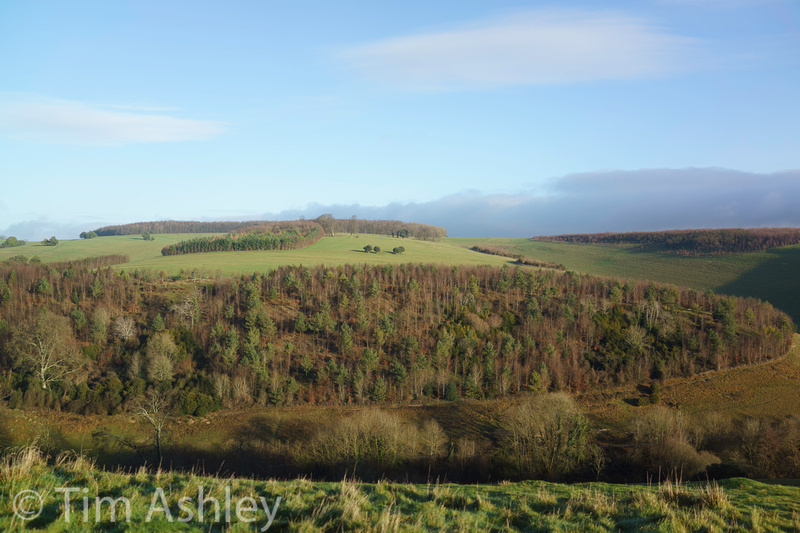
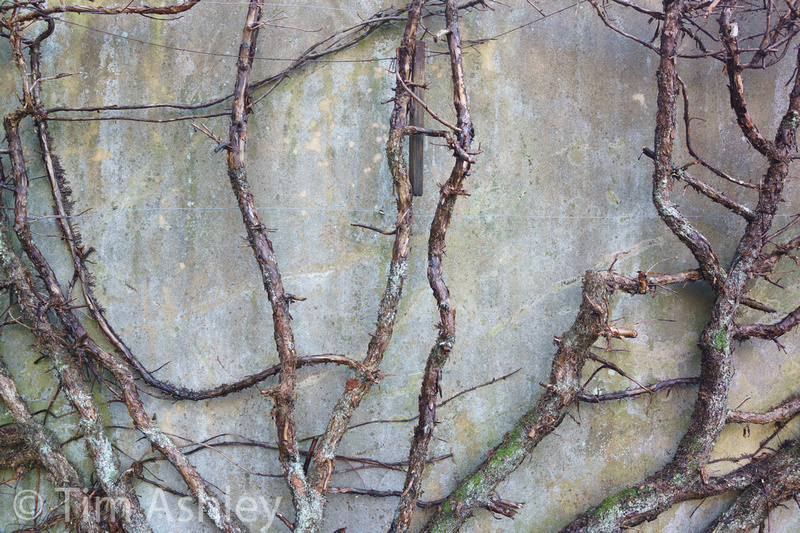
The far series is great news. There is no indication of the lens being less well suited to far scenes as I had feared. The scene as shot, focussed centrally on the furthest trees using 'double zoom live view' is an absolute torture test in that there is a lot of very fine, distant detail. Of course the scene out-resolves both the sensor and the lens and in certain places the finest detail is just a fine mush when viewed at 100% - and it is here that a D800 or a medium format back would have the advantage. But on the plus side, the frame is impressively sharp from edge to edge at every aperture but F22, and the micro-contrast is great. There is also no sign of the mid field weakness I showed at F4 in the mid-distance scene posted higher up the article. This is truly a crackingly good performance, right up there with the finest lenses I have ever used. What is marvellous is that the comparatively large pixel size means that, though peak sharpness is reached at F4, there is very little penalty to pay for stopping down to in order to gain DOF. In fact, the reduction in resolution is tiny at F8, tiny again at F11, more noticeable at F16 (but still pretty darned good) and it is not until F22 that real softness sets in. I would not hesitate to use the lens at F11 for even critical use if I needed the DOF. This is also true of the near series. The problem with shooting near series is that DOF is more limited at close range and very few subjects (except rather boring brick walls!) are totally planar. This means that at the wider apertures, some of the resolution is lost due to minor differences in placement in the field of focus. This scene, for example, is about 7.5 feet way to the closest branch and the total depth is less than eight inches. I focussed very carefully on the lichen covered branch dead centre and then checked that the edges and corners contained focussed elements (as far as possible) so as to ensure that the sensor was as parallel to the wall as possible. And what I see here is, again, no mid-field weakness and very very good sharpness throughout. But this sort of scene just shows how useful it is to be able to stop down without getting significantly diffraction limited: in order to gain enough DOF to truly 'get everything in' I needed F11 or F16 and this wonderful lens makes that eminently possible. Lens Conclusion Aside from the slight mid-field weakness I have sometimes seen at mid distances at F4, which is either a mild astigmatism or results from a 'triple witching' of very slight field curvature, very slight focus shift and particular points of focus relative to the subject, this is a very, very fine lens and IMHO is worth around 2/3rds of the cost of the entire camera on its own. After several months of shooting the D800E with a variety of lenses, finding a full frame alternative which makes getting sharpness from edge to edge and corner to corner so easy and so reliable, is a great relief. You only need a couple of pixels of lost resolution to negate the advantage of the higher pixel count D800 sensor and so, for many uses, I would actively choose the RX1 if I wanted the best results. It utterly rocks. Focus and Aperture Behaviour There's a lot of fuss online about this: the worriers are saying that the lens's occasional propensity to miss focus is caused by the fact that it performs AF with the lens stopped down to whatever aperture you or the camera have selected. The argument, it goes, is that when the lens is stopped down, the DOF is deep enough to create ambiguity about where focus should be placed. A DSLR (unless shot in Live View) always focusses wide open - and the narrow DOF makes the placement of focus unambiguous. All this would be worrying. If it were true. Take your RX1, and look into the lens. You will notice that in every mode, it focusses at the metered or set aperture for apertures of F8 and wider, and for tighter apertures than F8, it opens briefly to F8 for focus and then stops down to the shooting aperture for the capture. In DMF mode, tweaking the focus ring after focus is automatically acquired lets you focus manually with the lens at the shooting aperture, and in MF mode, the lens is always focussed at the shooting aperture. The above seems true in both 0.3-infinity range and in Macro range. Now this is all a set of design decisions on Sony's part, and there is some sense to it: they have clearly decided that focus needs an aperture of no tighter than F8 to be reliable. You might argue with their choices but there they are. But the way in which this works goes to the very heart of the problem with the RX1: just like the behaviour I described earlier, whereby Lens Distortion corrections are not applied to RAW files whereas Lens Shading corrections are, it seems to be undocumented. In other words, even now the bloody camera is in full production, they can't decided whether it's a pro model (in which case it should do things as a pro would expect, or make it very explicit in the documentation when otherwise) or whether it's an enthusiast model with an additional target market of rather less experienced shooters. And that, I find truly irritating. ETTR Finally for today, the great Expose to the Right debate. All experienced users are familiar with this seminal argument as to why you should always give the sensor as much light as possible without blowing any colour channel other than in specular highlights. And it is, of course, clever and correct and very useful. Knowing this, and knowing that the RX1 (like nearly all cameras) 'panics too early' about overexposure (because it bases its in-camera review histogram and 'blinkie' exposure warnings on a notional JPEG even when shooting RAW only) has lead to a lot of on-line chatter to the effect that the RX1 can usually be shot at +2EV over the metered suggestion. This, it is argued, gives the sensor a lot of data, thereby giving less noise in the shadows for the experienced RAW shooter. All true. BUT... consider the following: You are shooting a lovely field with gorgeous trees and flowers under a pale blue sky. Hang on, pale blue? Yup, they often are. And you don't have a graduated ND filter to hand. So ideally, to capture the sky's colour (and maybe even 'improve on nature' by making it look a little deeper) you want to underexpose the scene a little. However, to get good shadow detail in the shade-facing tree trunks, you want to overexpose. So you've read all this "overexpose by two stops, you won't blow the sky" stuff and that's what you do - and Lo! the review image blinks like crazy but in your RAW developer, not one channel is blown. You did it! You fed the sensor lots of light and it rewarded you by giving you loads of shadow detail. So all you have to do is rack Exposure down in post by about two stops, add some contrast and boost the shadows, and Bob's your uncle: lovely, noise-free shadow detail and a well -exposed scene. And this is what happens to the sky when you adjust it to how you want it:
whereas if you had exposed for the sky (by giving less exposure), it would have looked like this. The first file was given +1 stop over metered, the second -2. There is no free lunch - so before you go and shoot everything at the fashionable +2 stops, give it a try on a sunny day and see what balance really suits you. You might be surprised, or you might find that it works very well for you. I have other series where the effect seems different and I think this depends on the exact relative luminosity of the sky versus the foreground and the amount of adjustment made in post but I would add that in some scenes I have shot, using a heavy + compensation seems to skew the sky towards cyan without offering much benefit to the shadows. From now on, until I get total familiarity with the camera under a very wide range of conditions, I will shoot critical scenes at 'as metered' and at +1.7 EV so as to give me the best range of options later on. Coming up soon:
pip pip!
Keywords:
ETTR,
ETTR,
RX1,
Sony,
X-Rite,
aperture series,
camera calibration profile,
color shading,
color shift,
colour shading,
colour shift,
lens Review
Comments
Hi John! Great article. Would love it if you can share the camera profile you made for lightroom for the RX1. Any chance you can email me at [email protected] and I'll try to return the favor somehow as well?
Janrey(non-registered)
Great review and thanks for looking at the colour shading issues.
I sent a support request to Sony Australia in regards to the color shift issue and their half-baked response was "there are no known issues"... what a cop out. I hope others are able to get a satisfactory response rather than "sorry, it's not a problem, tough luck".
Igor(non-registered)
Excellent review! Did you read Lloyd Chambers?
Mark Gowin(non-registered)
Thank you so much for sharing your tests and observations of the the RX1. I value your efforts and can't wait to see how they compare to my own.
No comments posted.
Loading...
|