Field Curvature - a Layman's Guide (or How to Focus a 'Tricky' Lens)&layout=none&ref=https://tashley1.zenfolio.com/blog/2013/5/field-curvature---a-practical-guide)
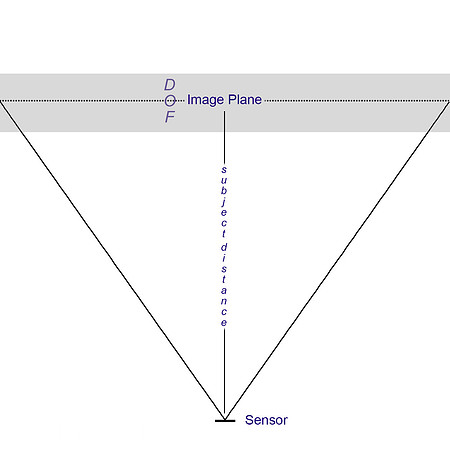
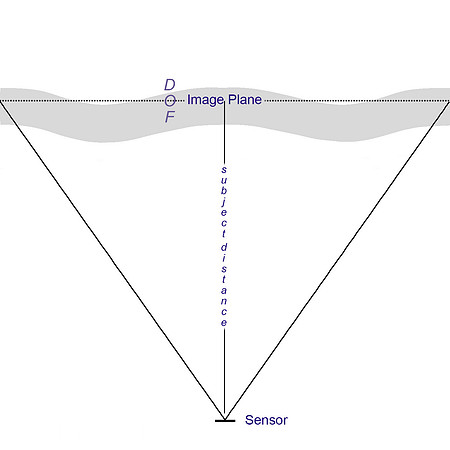
With additional material by Guest Contributor Roger Cicala of LensRentals (Photo: Library of Congress. Photographer unknown.) When I introduce this piece as 'a Layman's Guide' I refer, of course, to myself as the layman: for all I know, you have a PhD in astro-optical design and regularly grind your own elements. But for the rest of us, struggling with ever-increasing pixel counts and the need to understand our existing lenses whilst acquiring new ones wisely, field curvature and the impact it has on focus can be 'the last frontier' of learning and one of the most difficult to conquer: lens manufacturers and reviewers provide MTF data and information on distortion and chromatic aberration, sometimes even DOF tables but I have never seen data on field curvature. And yet it can have a significant effect on what is and what is not in focus in every frame you capture, with certain lenses. Understanding it can help you both visualise the field shape of an individual lens and adapt your focus technique accordingly. A sign that we have graduated beyond Photography 101 is that we begin to develop a proper sense of depth of field*. We know that it is deeper with wider lenses, smaller apertures and greater subject distance and we know, with some experience, that we can 'place it' where we want it. We also pick up some nuggets about circles of confusion and viewing distances and so on. But as pixel counts rise, I know I am not the only person who has noticed 'shape of field' effects more often, and struggled to pin down both the causes and how best to manage the effects. I am always jealous, when debating the potential merits of a lens online with other folk, to hear the suggestion that I should 'rent one and see.' The market for lens rentals is comparatively underdeveloped in the UK and I long for access to a company such as LensRentals, an Aladdin's Cave into which I can peer but not enter. And peer I do, especially at the excellent blog of Roger Cicala, the only man I have ever seen wearing a lens case as a hat. Roger sits at the perfect intersection, for me, of theory and practice. He loves lenses, loves finding out what they are capable of, and has a profound technical understanding of both what to measure and how to measure it. I am very grateful and honoured that he has agreed to contribute to this article. So: I am going to write an explanation of my understanding of field curvature (won through sweat and a bit of layman's study) with a mixture of simple theory and practical examples and suggestions - and then Roger is going to tell us all where I am wrong and what other considerations we might take into account. Let's start. Imagine, for now, that we live in a two-dimensional world where the scenes we photograph have depth and width only. This will help my diagrams make more sense and will also facilitate an initial understanding of the subject for the uninitiated. I will add height, the third dimension, later. When we first learn about depth of field, we generally have it explained to us like this:
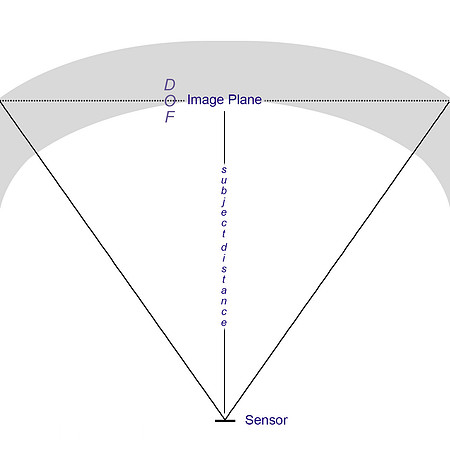
Fig.1 Schoolboy geometrists quickly spot, however, that the edge of the planar subject is further away from the sensor than is the centre. Thus, if a lens focusses at the same distance across the frame, then the 'shape' of the in-focus field will naturally be curved. Theoretically, that curve would be a section of a circle with the sensor at its centre (I am taking some short cuts here to keep it simple). And that means that the edges of our planar target would fall outside of this arc and therefore, if shot with very thin DOF, be out of focus. In practice, there are several solutions to this:
Lens designers have several competing and often mutually exclusive aims: they want large maximum apertures, low distortion, minimal chromatic aberrations, controlled vignetting and low astigmatism to name a few. And correcting for natural field curvature (literally bending nature) is to some extent incompatible with some of their other aims. So in practice, all modern digital camera and lens systems shoot somewhere between 2) and 3) above. The result of this is that almost no lenses you will ever use have a perfectly flat field, and almost none have a perfect 'section of a circle' field. Instead, they come in varying shapes such as 'croissant', 'wave' or 'runway' (my terms) and, these shapes can direct their acute angle towards or away from (rearwards field curvature) the sensor. Now let us add in, with the help of some diagrams, the idea of depth of field to the idea of 'shape' of field. Note that these shapes are simplified and idealised in order to illustrate certain types of curvature. In the real world the shapes are more complex.
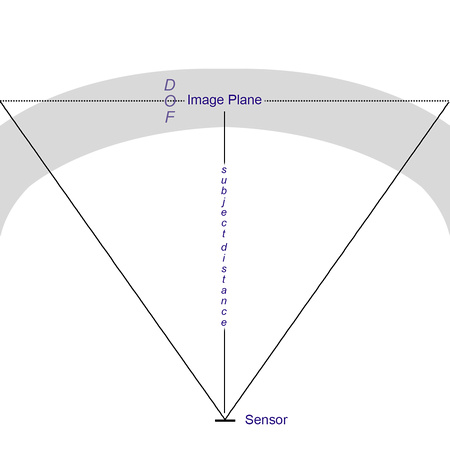
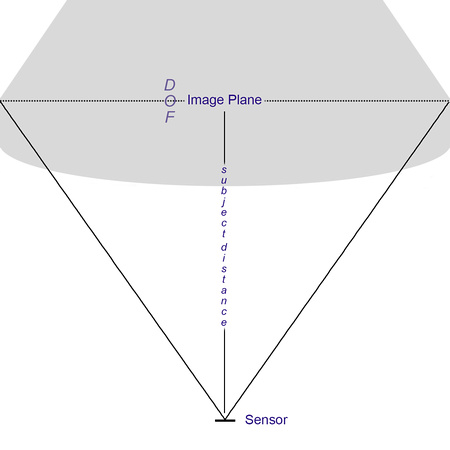
In the above diagram, the field shape is an arc which is not a perfect section of a circle. In other words, the lens design has partially corrected the field curvature by flattening it. And, because we have stopped the lens down a little, there is now some depth to the field of focus too. In fact, there just enough correction and just enough depth to get the entire planar subject in focus. But if we place the exact point of focus slightly differently, we move the position of the field of focus relative to the subject plane and this happens: the edges are out of focus. Bear with me here: the exact shape of the field of focus shifts as you change your point of focus and that makes matters more complex but for now, it might help to ignore that factor!
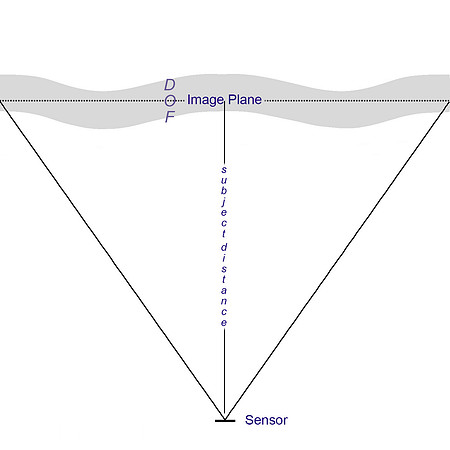
Fig.3 Field shapes can also be 'wavy' as noted above and as the following two diagrams show, this wave-shape (again a result of a compromise between competing design aims) can either not matter or matter quite a bit depending on exactly where you place focus:
The second diagram (Fig.5) is a simplified explanation of what might be happening for some cases of 'mid-field weakness' in a lens: the 'placement of the field of focus' has moved closer to the sensor relative to the first diagram because the lens has been focussed to a slightly shorter distance. The subject on centre is still in very good focus but parts of the mid-field sections of the image plane are slipping in and out of the field of focus. I have made focus-bracketed series of shots which seem to indicate that this is happening. Field shapes vary widely: quite possibly both wave shaped and curved, for example. One frequent field shape (see my review of the Nikkor 28mm F1.8G for a very graphic illustration of this) is the 'runway':
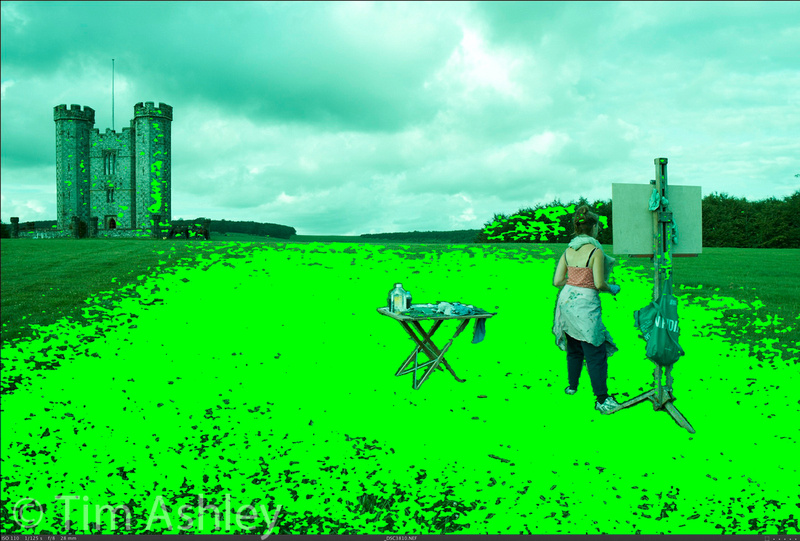
If you ever have images where a middle-distance planar subject is in good focus edge to edge, the distant parts of the frame are sharp on centre but OOF at the edges, you have a runway on your hands. It looks like this: excuse the odd tint! The yellow area is an approximate focus mask, focus is at the distance of the easel. Clicking on it will load a full-sized D800E version of the same file but without the tint and mask so you can look in more detail at the exact field of focus, which actually extends to the very far horizon in places.
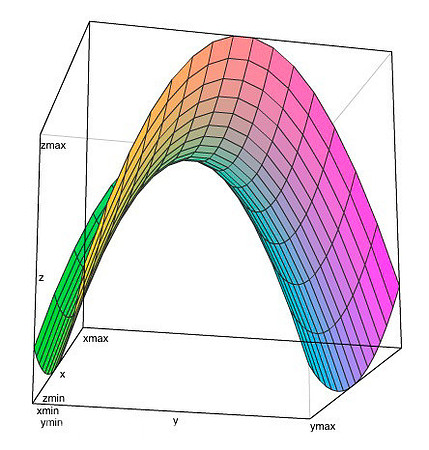
Fig. 7 Now let's escape from some of the simplifications of the above so as to approach a more practical set of observations. Firstly, let's add the third dimension: height. In the above diagrams we have looked at a 2D cross section of reality but of course, the shapes we have been looking at need to be visualised in three dimensions. This is too complex a topic to illustrate without interrupting the larger flow of this piece and in real world use it is often enough to stick with the 2D visualisation - but if you want to go further, think of it like this: the example above shows a roughly runway (or triangular) shaped field of focus in 2D. in 3D this is more like a cone. Of course some of that cone-shaped field of focus is bisected by the ground itself so what you see on the ground is a triangular shape because (schoolboy geometrists again!) a triangle is one possible cross-section of a cone. The second part of the problem is that my field experience indicates that the shape of this 3D form changes, a lot, even within the use-case of one lens on one camera: the distance at which you set focus and the aperture you choose combine to determine that shape, but it might change radically as those parameters shift. The third part of the problem is that, having imagined the exact shape and position of that form within the cuboid of your image field, you need to imagine how it intersects with the physical elements in your scene (tiny foreground grass, short, nearby people, tall mid-distance trees, far mountains). Phew. This really is a pig and I am sorry I'm not able to describe it more simply. So: how do we discover the shape of this form, and what are the practical implications when choosing and using lenses? In an ideal world [Roger, can you do this? ;-) we would all really appreciate it!] we would have a nice little 3D rendering app on our smartphone that allowed us to enter the following parameters:
The app would then pump out a 3D rendering of our cuboid 'frame' and within it, a shape representing the field of focus. It might look a bit like this, for example, and we could see it get fatter and thinner or more or less concave, or even change shape completely, as we changed our parameters. We could then grab it and rotate it so as to visualise how the elements within our image might intersect with it.
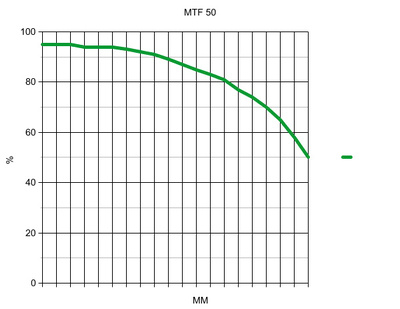
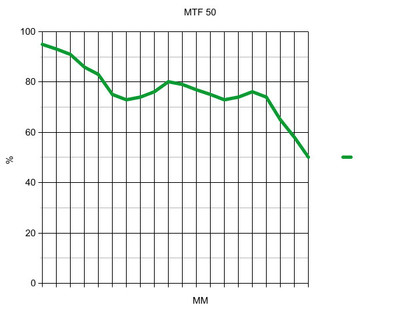
Fig. 8 The bad news is, I don't see this happening any time soon. The good news is, it exists already, sort of: it's called the human brain: really experienced photographers learn their lenses and, whether consciously or not and possibly by use of focus or aperture bracketing, manage to match the shape of the 'form of focus' to the 'stuff in their pictures' so as to give the results they want. We're not all that good, though. I'm certainly not. So here are some practical tips: Firstly, look at MTF graphs: here are two entirely fictional MTF 50 graphs at F5.6 for two imaginary lenses. They assume no astigmatism (so perfectly aligned saggital and tangential plots). They show two fairly familiar shapes and, all other things being equal, they indicate that the first lens might have some form of field curvature (whether forwards or rearwards) and the second lens might have a 'waved' field shape. There are other factors that can affect the shape of the MTF too - but charts like this can be a clue.
Secondly, find a large field with some distant trees. Get someone to stand so that they are centre frame and about one third the height of the image field. Focus on their face very carefully and then shoot wide open and at F5.6 and then look very careful at the shots at 100% on screen paying particular attention to the blades of grass: the areas where the grass is in focus can really help visualise the field shape, albeit in a two dimensional plane. Lastly, shoot a highly textured brick wall (the biggest you can find) at, say F4 and from as far back as you can get, preferably at least 25x the focal length of the lens . Focus it as perfectly as you can, using a tripod. Now shoot another frame with the focus pulled a little closer and another with focus pushed a little further. See which parts of the wall are in best focus in which frame. Any tricky aspects of a lenses field shape can be revealed by such a test and it is surprising how a lens that you think is just 'soft at the edges or corners' can show itself capable of better performance in those areas with just a small change of focus. For most photographers, most of the time, none of the above matters. For a start, the 'shape' of subjects in the image will very, very often hide these issues. But to many of us it does matter often enough: some lens that seems always soft at the edges might just need a slightly different fine tune setting, for example. Small changes can genuinely help. Some lenses, and I have recently named here the Leica 35 Lux and the Nikon 28 F1.8G, just feel 'tricky: they seem to be giving inconsistent results and that can make it hard to achieve uniform focus across the field. This is usually, in my experience, due to unexpected shapes of the '3D form' that describes the field of focus. A 'tricky' lens can become a great lens if you just learn to focus it differently: that might involve changing you fine tune value, or habitually deciding to slightly back or front focus it at certain apertures. Of course, the problem is that as you shift the point on which you place exact focus, you shift the shape as well as the position of the field itself (a fact ignored for simplicity's sake in the diagrams above) so getting it just right is an iterative process. A really good example of this is seen in shooting certain lenses on the new Leica M240: focussing through the rangefinder (on my copy at least!) tends to place the entire field of focus of some lenses slightly further away than shooting with the EVF when stopped down and this can, depending on the shape of the field, either be a good or a bad thing. Now it is important to know that this isn't a mistake as such: there is a certain depth of field when stopped down and an EVF can 'see' the subject as being in focus at any one of a small range of distances, whereas the rangefinder is agnostic of aperture and therefore of DOF - and seems to have been calibrated to 'get it right' when working with the focus cam shape on the particular lens. The RF seems to work particularly in favour of lenses with small focus shift and some forward field curvature. This has implications for all EVF users on any system, and they are I hope clear enough not to need further description. All of the above also has implications for the accuracy of 'focus and recompose' with some lenses, and for the importance of accurate peripheral focus sensels on DSLRs when used to shoot off-centre subjects on lenses with 'interesting' field shapes - because if the field of focus is curved, then subjects on, say the thirds, may not be in perfect focus when a central object on the same plane is in focus. Here are two images to illustrate what all of the above can mean in practice. They are both taken from the additional material I added to my recent review of the Leica 35 LUX FLE on the M240. They were shot as part of a 60 shot series including many brackets and iterations so as to provide representative rather than one-off results. A Gitzo 3 series CF tripod with Arca cube and self-timer were used. Both are shot at F4. The first was focussed with the EVF wide open (which gives pretty much the same result as with the rangefinder) and the second is focussed with the EVF stopped down. Remember, this is the same lens, same camera, same time, same position, same everything apart from the slightly different focus offered by two pretty accurate methods which happen to place the field of focus slightly differently. The differences are very clear, very educative and not in my experience very unusual with this type of fast wide lens. EVF focus at F4 shot at F4: the centre is a touch sharper than the first shot but much of the rest of the frame is a mess though the extreme corners are moving back towards sharp focus. So what has happened? My theory is that the known slight focus shift of this lens means that if you focus wide open and then stop down to shoot, the entire field (and shape) of focus moves backwards from where you placed it by focussing wide open. This does not perfectly suit the central POF if you are looking for absolutely critical focus but it does work well for the frame as a whole. But if you stop down first and then focus, the central POF is looking excellent but the rest of the frame looks quite poor. This shouldn't be too much of a surprise: Leica M lenses were designed to be focussed at no particular aperture but to do as well as possible at all of them on average and, vitally, to focus well wide open. If you focus stopped down (in the new world of EVF) you are shifting the focus field around in ways that were not originally anticipated by the lens designers and which give, on average across the frame, a less good result with some lenses. So EVF shooters on the M240 take note: I have found that stopped down EVF shooting tends to pull the entire field a touch closer with certain lenses. DSLR shooters using 'phase detect' AF are affectively focussing wide open too, but unlike rangefinder shooters they often have the ability to make quick, in-camera tweaks to the fine-tuning of this system. They might benefit from adding as much + compensation to fine tune as they can get away with considering their wide open shooting needs. In any event, the nice thing about the above two frame example is that even if I had presented the shots the wrong way round, or focussed badly, or had a significantly warped target, the fact would remain that the frame that is sharpest on centre is weak at the edges and the frame that is best over the whole frame on average is a tad less sharp on centre. That is the exciting world of field of focus, folks. Lastly from me: 'interesting' field shapes can be useful in real-world photography. The 'cone shape', for example, is great for shooting an avenue of trees receding away from you in landscape orientation, because the shape of the field of focus matches the shape of the subject. The real world has few planar subjects - and yet pretty much every piece of lens data you will ever see coming out of a lab is captured using a planar target. One man straddles the boundary that separates lab from real world. His name is Roger Cicala of LensRentals, and he will now talk more sense than me...
Roger Speaks
Field Curvature and the Area of Focus
Justice Stewart Potter, ruling on a pornography case, stated, “I can’t define it, but I know it when I see it”. Field curvature, to me, is exactly the opposite: I can define it, but I’m not sure I always know it when I see it.
I can definitely see field curvature in most photographs taken back in the days when men were iron and ships were wood. Have you ever noticed that in old group photographs the photographer often arranged the subjects in an arc? A good photographer back then knew the field curvature of his lens and arranged the subjects to keep them in the plane of focus.
Fig. 10: Chaplains of the 9th Corps, 1864. Library of Congress. Photographer unknown.
Way back in 1840, Joseph Petzval used the world’s first parallel computer (actually 10 artillerymen skilled in trigonometric computations) to determine, the formula for field curvature, which we still call Petzval’s Sum. When Petzval’s Sum = 0 the lens has no field curvature.
Petzval’s calculations also showed ways of using thick meniscus elements and air spaces between the elements of a lens to reduce field curvature. When high-index optical glasses became available around 1900 it became possible to nearly eliminate field curvature – at least in theory.
Because field curvature is defined mathematically, the lens designers (and manufacturers) know exactly what the curvature is for each lens. A very few lenses (mostly older Leica and Zeiss) actually gave us the theoretical field curvature information in chart form – but almost none do these days.
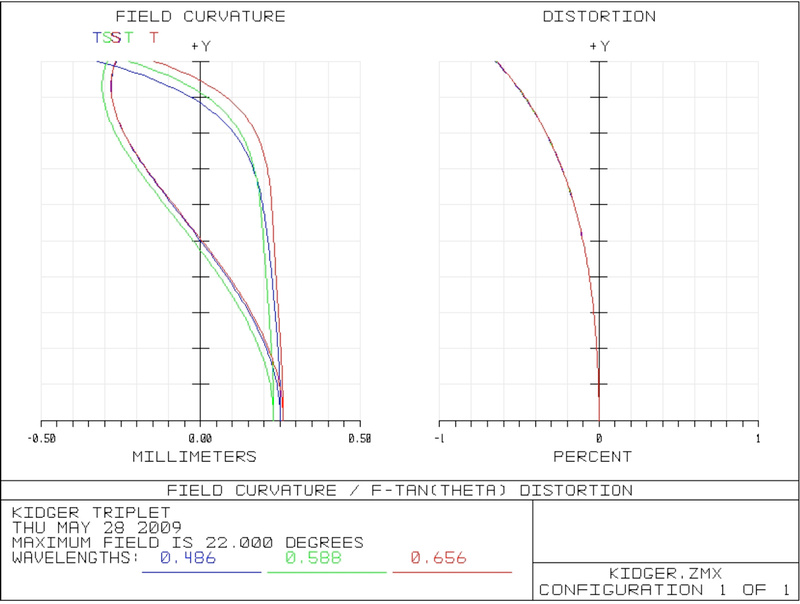
The Zemax diagram below shows the computer derived field curvature for a simple lens. Note that the curvature is different for different wavelengths of light and for sagittal and tangential rays (more about that later – I know you’re excited).
Fig. 11: Computer generated field curvature diagram. www.johnloomis.org The curvature represents one – half of the image from the center to one edge.
Field Curvature in Modern Lenses
Field curvature is less of an issue in today’s lenses, of course, but many people wonder why it still exists at all. One reason is that all lens designs are compromises and in some cases a lens designer decides leaving a bit of field curvature is better than having other aberrations.
Another reason is that as photographers we use the term ‘field curvature’ when we are really describing ‘area in best focus’. When the area in best focus is curved or complexly shaped we say the lens has field curvature.
The curvature we see in our photographs is somewhat different than what an optical physicist designing a lens would consider field curvature, or what shows in a graph like the one in Figure 2. That’s because the area of best focus in a lens is influenced by all of the aberrations that lens has, including field curvature.
But we photographers (as Tim has done above) use the term ‘field curvature’ to describe what should really be called ‘area of best focus curvature’.
Going PhotoGeek for a Minute
If you want to skip the geeky stuff and scroll down to the Some Real World Stuff heading below, I’ll understand.
Two of the 7 primary aberrations, field curvature and astigmatism, are rather interrelated. In a lens with no astigmatism, sagittal (along the line from the center of the lens to the edge) and tangential (at right angles to the sagittal line) lines are equally sharp.
Fig 12: No Astigmatism
Most lenses do have some astigmatism, however, so the plane of focus for sagittal lines and tangential lines are slightly different. Focusing the same lens slightly differently would give something like the two images below.
Fig. 13: In a lens with marked astigmatism, changing the focus slightly brings either the sagittal or the tangential lines into sharp focus, but not both.
The tangential and sagittal lines not only may have slightly different planes of focus (astigmatism) but may also have different field curvatures. Lens designers sometimes use this phenomenon, purposely creating some astigmatism and giving the sagittal and tangential lines slightly different field curvatures to get the best compromise for their lens.
In the image below, for example, the tangential lines are blurred along the edges and corners, while the sagittal lines are blurred in the mid field. Changing the focus slightly might reverse the effect. The designer has created a lens where something is always slightly out of focus, which might be much better than a lens where some part is very sharp and some part is hugely out of focus.
Fig. 14: Complex astigmatism with field curvature
It’s getting rather complex, isn’t it? And that’s just the beginning. Lens designers must also balance minimizing other aberrations and maximizing resolution with reducing field curvature. What we perceive as the area of best focus is also affected by spherical aberration, coma, and longitudinal and lateral chromatic aberration.
And those are just third-order aberrations. There are also 5th, 7th and even higher order aberrations. But I hear you begging. I won’t go there.
But one thing that is important to remember is that each aberration increases with distance from the center of the lens and with aperture – but the two factors affect each aberration differently (and exponentially). Stopping down your aperture affects the different aberrations differently.
Field curvature and astigmatism, for example, worsen linearly with aperture, but as the square of distance from the center. So stopping down decreases them somewhat, but not as much as distance from the center increases them. Coma is the opposite: it changes linearly with distance from the center, but as the square of aperture. So stopping down decreases coma much more than field curvature. Spherical aberration is completely related to aperture and stopping down has a huge effect on spherical aberration.
The takeaway message is this: stopping down the aperture improves field curvature and astigmatism somewhat, improves coma a lot, and improves spherical aberration most of all. The sum total of these effects changes our ‘area of best focus’, which is what we photographers really mean when we say 'field curvature'.
That’s why I’m not too worried about the manufacturers not giving us computer generated field curvature graphs like Figure 2. Their field curvature isn’t exactly what we see anyway.
Some Real World Stuff
In the real world, testing for field curvature (area of best focus) in an optical lab is difficult and requires specialized equipment – and even then will probably only gives you a result at one focusing distance and aperture.
I spent a lot of time trying a dozen different techniques to find something simple that a person could do at home to evaluate their own lenses. (This included setting up test targets of a dozen ‘Lens Align’ rulers side-by-side, photographing large charts made up of dots, lines, and multiple AF1951 targets at various angles, etc. None of them were very effective).
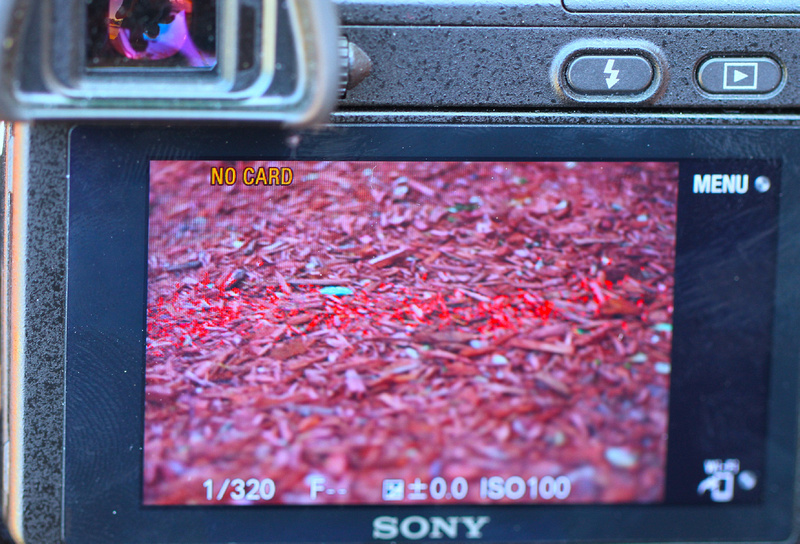
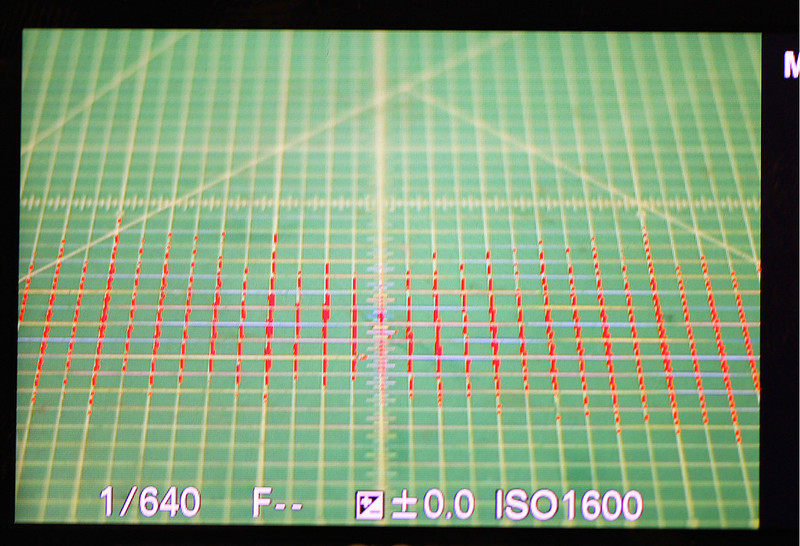
What is fairly effective is the simplest thing of all – take appropriate pictures and look at them them. A lawn of cut grass with a target in the center works well. For closer imaging a simple grid, like my $12 work mat or a mulched garden (shown below) is excellent.
If you have a camera with focus peaking you can get a fair idea of the field curvature right in the viewfinder. If not, opening the image in Photoshop and performing a quick ‘find edges’ filter and a parameter adjustment or two will highlight the areas of best focus just fine.
Figure 15: Focus peaking (bright red) shows this Leica 90mm f/2.5 lens, like most telephoto lenses, has very little field curvature at 12 feet focusing distance (at least on a crop sensor camera).
Fig. 16: This Voigtlander 75mm f1.8, on the other hand, shows a complex field curvature at 6 feet distance. Notably the depth of field is narrowest in the center of the image becoming wider away from center. I should note for these demonstrations I chose slightly telephoto lenses to allow a narrow enough depth of field for the demonstration at these distances.
What Generalizations Can We Make?
1. Anecdotal reports suggest that wide-angle rangefinder lenses exhibit more noticeable field curvature than SLR lenses. This may be because of differences in rangefinder focusing or because few rangefinder lenses are reverse telephoto design. (Reverse telephoto designs have more lens elements, giving the designer more opportunity to correct field curvature.)
2. The actual curvature is improved to some degree, and often changed in shape, by stopping down. Of course, increased depth of field helps mask field curvature.
3. Field curvature increases as the square (3rd order curvature) or 4th power (5th order curvature) of the distance from the center of the lens, so it naturally is more severe toward the edges of a full-frame image. Lens designers know this better than us, though, and use their tricks to minimize this – which results in more complex curvatures affecting the mid range, etc.
4. A given lens may exhibit different curvature at different focusing distances.
5. Taking a few controlled photographs and evaluating them with a bit of pixel-peeping will give you a good idea of the field curvature in your lens.
6. The lens’ MTF chart, particularly if it shows a ‘dip’ in the mid range or widely separated sagittal and tangential MTF, may hint that a lens has field curvature.
Now the truth is that the majority of lenses these days exhibit very mild field curvature, if any. But there are certainly a few that do and those few tend to be superb wide-aperture prime lenses. If you have one or two of those, taking a few minutes to evaluate the pattern of its field curvature (and I still prefer the term ‘area of best focus’) can improve your photography.
© Roger Cicala 2013
* I am going to assume the following rough but practical definition of field of focus in this article: "a picture element is considered to be within the field of focus if, at your chosen physical reproduction size (whether on screen or in print) and your chosen viewing distance, that element is subjectively in good enough focus for your needs." We could redefine all that in terms of circles of confusion but really, what's the point?!
Keywords:
D800,
design,
fast,
field curvature,
Leica,
lens,
Lensrental,
M240,
Nikon,
optic,
Roger Cicala,
tashley,
Tim Ashley,
wide
|